Launch guide
SAND Trampler Guide - Modules, Builds, Weapons & Repairs
Learn SAND Trampler basics: module protection, storage, weapons, repair priorities, and beginner layout rules.
Quick Answer
A useful SAND Trampler guide treats the Trampler as a mobile base with protected modules, storage, movement, and extraction value. Beginners should protect reactor, storage, engine, and recovery tools before building for maximum firepower.
Field Notes
- Core role
- SAND Trampler guide focus: mobile base, storage, defense, and extraction platform
- Beginner priority
- Protected critical modules before weapon spam
- Build lens
- Scout, hauler, balanced, or gunship
- Common failure
- A pretty layout with exposed essentials
Source-backed screenshots
Screenshot Walkthrough
Images are pulled from official store, support, or publisher video sources so the page shows real game evidence instead of decorative artwork.

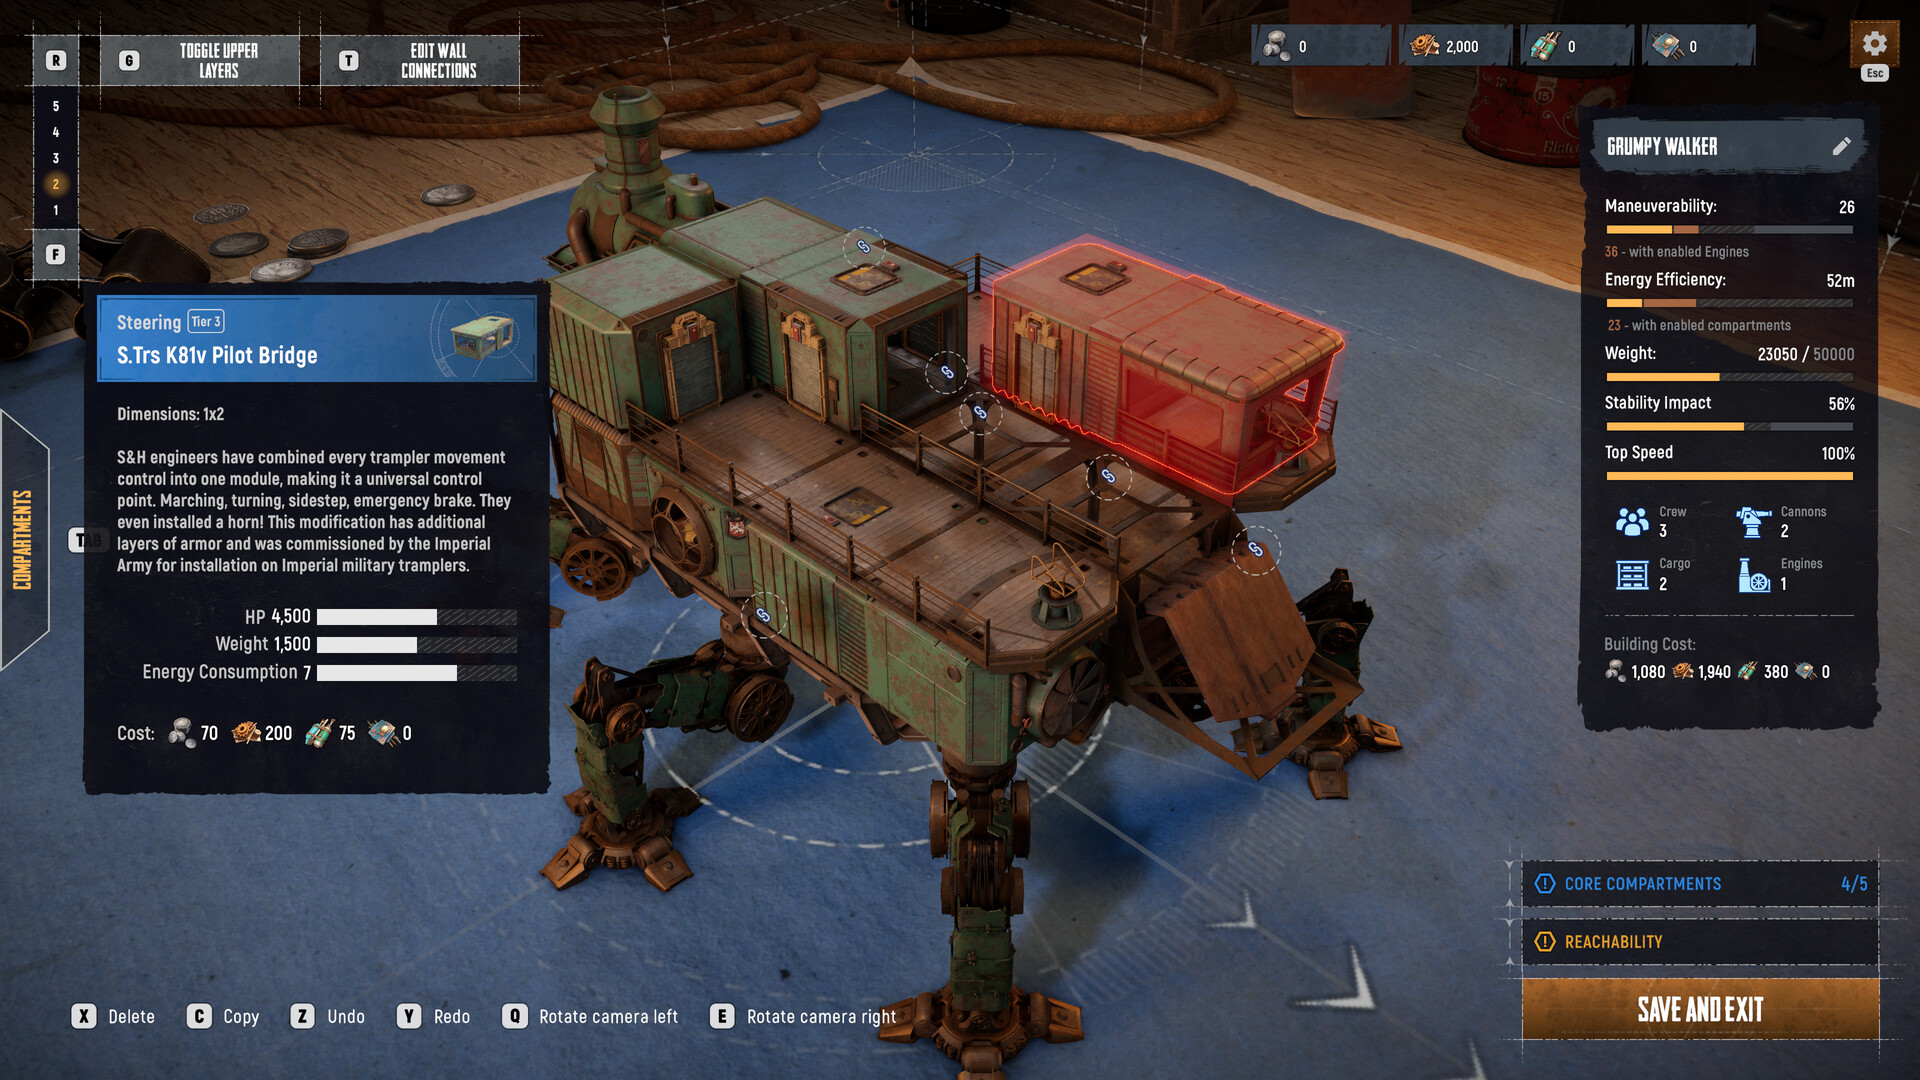
Use this Trampler layout image when explaining protected cores, firing angles, storage placement, and why pretty builds are not always survivable.
Use this Trampler view to explain why route planning, module protection, and extraction timing matter more than ordinary shooter reflexes.
Keyword fit and page role
SAND Trampler guide is the primary keyword for this page because the searcher is trying to make a specific decision, not browse a broad wiki. The page uses SAND Trampler guide in the title, quick answer, verification flow, FAQ, source notes, and internal links so the phrase stays clear without turning the article into repeated filler.
For SAND Trampler guide, the searcher wants a playable route, build habit, or decision rule they can use in the next raid. The useful SEO target is not raw repetition; it is a page that answers the query, shows official evidence, and gives the player a next action. Keeping SAND Trampler guide visible above the fold also helps Google and players understand that the page is about the exact search they typed.
Read the screenshot before the checklist
The official gameplay screenshot is included because SAND Trampler guide needs visual context. SAND is not a normal corridor shooter; the large Trampler, open terrain, exposed modules, and long route decisions change what beginner advice means. The screenshot lets the page point at real terrain, movement, or build pressure instead of describing an abstract system.
The Trampler screenshot helps explain why module layout is gameplay, not decoration: exposed corners, poor firing arcs, and bad storage placement create losses before combat even begins. When the image shows a walker, ruins, or combat pressure, treat it as a planning prompt: where can you turn, what module is exposed, what path lets you leave, and what mistake would make extraction harder? The written guide should teach that reading process.
The practical rule
Build from the inside out: protect essential modules, keep movement reliable, then add weapons that cover the angles your route actually exposes. A good guide should give players a decision rule they can apply without memorizing a wiki table. In SAND, that usually means deciding before the run what success looks like, what loss is acceptable, and what condition forces the crew to leave.
If the rule cannot be used while under pressure, it is not specific enough. Replace vague advice like "be careful" with checks such as fuel state, storage value, escape angle, module damage, enemy contact, and whether the Trampler can still rotate out of danger.
How competitors handle this intent
Strong extraction-game guides for titles like ARC Raiders, Escape from Tarkov, Dune: Awakening, and Last Oasis usually pair each key decision with a map, UI shot, route image, or build example. They succeed because the player can compare the guide against what they see in game. This page follows that pattern with official SAND screenshots and direct source labels.
The weak version of this page would be a long essay about "survival" and "teamwork". The useful version tells the player where to look, when to leave, what to protect, and which mistake costs the run. That is the standard every SAND Raiders of Sophie gameplay page should meet.
How to improve with your own screenshots
The current screenshots are official store and video assets, which are safe for the first version because they are real and source-backed. The next upgrade is to replace or supplement them with captured in-game screenshots: map route, extraction prompt, fuel state, Trampler editor, storage module, damage state, and post-run result screen.
When adding user-captured images later, keep the same rule: every image must solve a problem. A screenshot should show where to click, what warning to notice, what module to protect, or what route choice to make. If it only makes the page look busy, remove it.
Steps
- 1Identify the modules that end the run if destroyed or exposed.
- 2Place storage and core utility away from the most obvious impact edges.
- 3Check whether crew can move, repair, and fight without blocking each other.
- 4Add weapons only after movement and storage feel safe.
- 5Review firing angles from the terrain where you actually park.
- 6Keep a repair and retreat plan before adding another offensive module.
Common Mistakes
- Building for screenshots instead of survivability.
- Putting critical modules on exposed corners.
- Adding weapons with poor firing angles.
- Ignoring crew movement and repair access.
Official Sources
Update Policy
- Use official store, support, and publisher pages before copying claims from community posts or third-party store mirrors.
- Early Access details can change after patches, discounts, regional store updates, or server announcements, so every factual page needs a visible review date.
- Steam Charts and similar tools are useful context for activity, but they are not official server-health or matchmaking-capacity sources.
Add real Trampler editor screenshots when you can label module placement and damage paths clearly.
FAQ
What is the Trampler in SAND?
The Trampler is the large customizable walker that carries mobility, storage, defense, and extraction value through a raid.
What should I protect first?
Protect reactor, storage, engine or movement utility, and any recovery tools that keep the run alive.